Monthly Archives: June 2013

Where Do You Stand On Mismatched Bridesmaid Dresses?

The recent trend of mismatched bridesmaids is hotter than latkes straight from the frying pan. We are seeing the gals dressed beautifully — differently — but beautifully. Brides have many reasons for encouraging this look, including each bridesmaid’s own style and look, size and body shape, and nurturing individuality instead of a cluster of girlfriends. While it can sometimes be easier to just pick out a single dress in a single color and dress your maids in that uniform, coordinating mismatched bridesmaids doesn’t have to be too complicated. They can still be your team as you say “I do” even if they’re dressed in a way that represents them for the reasons they’re your besties in the first place. And in the end, you have a great vision that comes to life down your aisle.

One Color, Many Shades
Have a view for the hue. You can choose a monochromatic color scheme for the dresses by selecting a general color and then differentiate each bridesmaid with a different shade of that color. Working with neutrals? Try beige, champagne, olive, mocha, and cream. Want something bright like pink? You can do salmon, fuchsia, ballet shoe, bubblegum, and rose.

See where this is going? All of the shades complement each other and belong to the parent color, but still showcase their own individual splash. If you’re concerned about the look being too inconsistent, just remember that your maids will most likely carry identical bouquets or you can gift them a piece of jewelry that ties the ensembles together. Take it up a notch and give the gals the same accessories like patterned tights or a sash tied in a bow.

Different Colors, Same Dress
You can still achieve the mismatched look if all your bridesmaids wear the same dress. How? Different colors! If it’s reasonable to put all the girls in the same dress, spice up the look and include splashes of color. Again, the colors are still complementing each other, but they’re changing a single dress to appear as different dresses.

This has been successfully executed with jewel toned or peacock colors. This concept also works well with pastels. The same dress in baby pink, gray, lavender, and cream would be so soft and beautiful. Likewise, a single dress that’s worn in purple, turquoise, magenta, and midnight blue could be breathtaking for a bright and dramatic look.

Different colors in similar dresses were made famous thanks to everyone’s favorite blogger, Carrie Bradshaw of Sex and the City. Remember her wedding? Miranda, Charlotte, and Samantha all wore long, glitzy dresses but each in a different color. The dresses were not exactly the same, but they definitely landed in the same family of dresses: fabulous.

One Color, Many Styles
Another way to change up the individual look of each bridesmaid is to select one color in the same shade, but wear it on any style dress. Pick a color. Purple? Blue? Cappuccino? Great. Now, find dresses that come in that one color. The best way to do this is to choose a single dress designer. Stay within that brand and order at the same time to ensure that your color swatches are consistent. Most designers can accommodate their many dress styles and cuts in one color.

Pick two or three varieties of the dress. Maybe with straps, without straps, and one shouldered. Or long, short, and tea length. Or ruffles, sash, or sweetheart neck. All of these styles are different groupings from the same family. Make sure, though, that the varieties or more or less evenly distributed. The maids should stand out as individual bridesmaids, but not take away from each other or you. Therefore, a bridal party with four short dresses and one long dress may do more to distract than blend, especially if you’re the only one in a long wedding gown. So as you distribute styles of dresses among the bridesmaids, make sure that the same types are sprinkled evenly.

mismatched-bridesmaid-dresses

mismatched-bridesmaid-dresses

Want More?
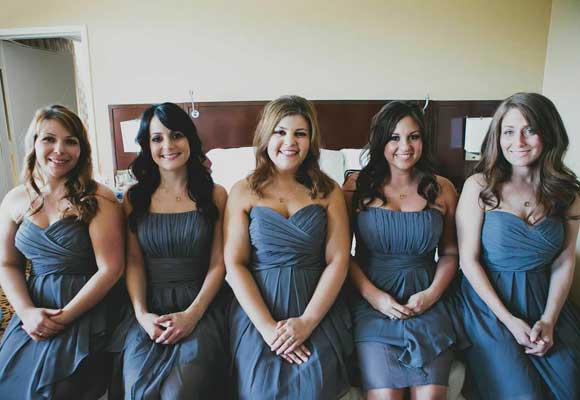
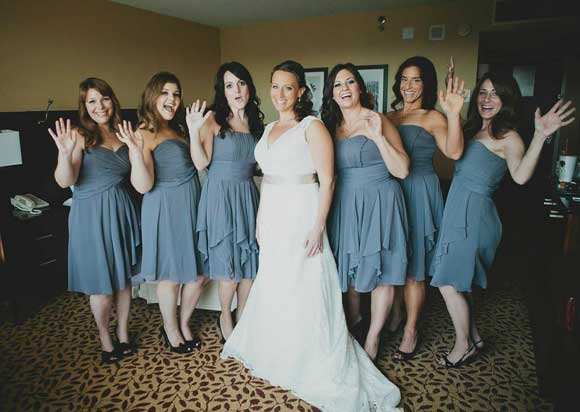
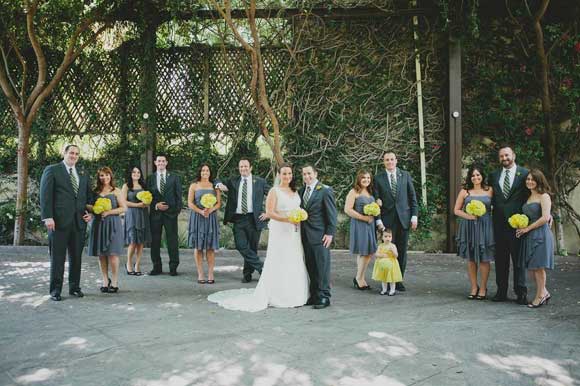
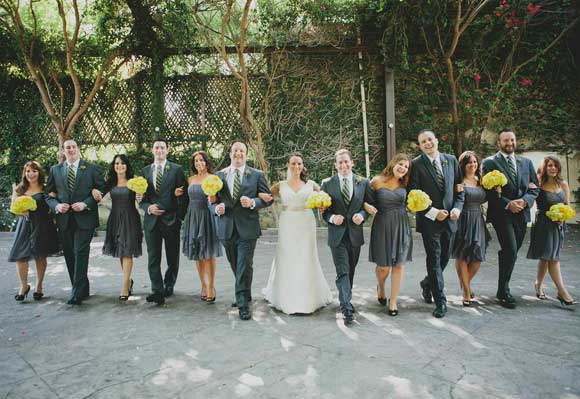
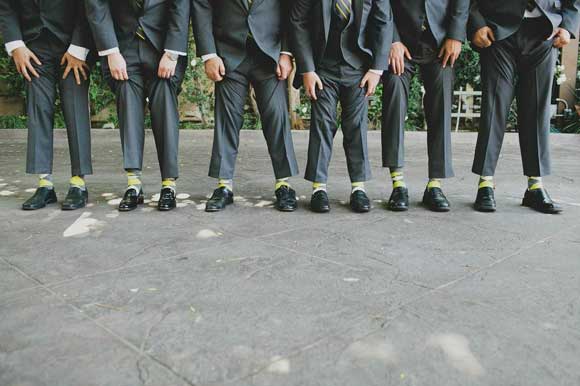
Other ways to spice up your bridesmaids with different looks: The girls can all wear earrings… but in different colors! They can all have bouquets… but with different flowers! They can all wear one shoe color… but in various styles! Pick a theme and then go wild. You don’t have to make every piece different in a bridesmaid’s look, but stay within a range to maintain the vision. The gals in the first picture below are all wearing the exact same dress style and color. Then, your eye catches their ankles and below and it’s like a party on their feet! Super fun. Underneath, the photos shows the opposite: the bridesmaids are all wearing different dresses within the same style and color scheme, but their tootsies are all hugged by the same shoes! Swoon!

So what do you think? Are you going for a mismatched bridesmaid look? What are some ideas you have for achieving this super hot trend?

911! 911! Wedding Day Emergency Kit!!

We should all be prepared for natural disasters — earthquakes, hurricanes, fires — but what about wedding disasters? Hey, they happen. Certain things you can’t avoid… like the best man getting too drunk and telling embarrassing stories during his toast. But there are other small snags you do have control over, and I’m here to help you make sure you’re prepared for bridal emergencies.

Also, I have a special treat for you: It’s my birthday on Friday. I’m turning 30. My lifetime is basically 75% of Moses’s little stroll through the desert. I am SO. OLD. So for MY birthday, I’m giving YOU, one lucky reader, a bridal emergency kit… or what I like to call, Meshugena Materials. Ya know, for when something wrong happens and you kind of go a little meshugena because it’s only the most important day of your life. So, happy birthday to me! Let’s find out about what every bride should have in her Meshugena Materials.

emergency

Pain reliever:
You might wake up with a headache or accumulate one from stress throughout the day. Pop a pill of your choice and let your pain melt away. Stock up on a small travel pack or travel bottle and add it to your Meshugena Materials. Headaches can be such a buzz kill!

Band-Aids:
Those damn shoes from your rehearsal dinner might have left a bad impression on your feet. I know, they were Chanels, but still! Beauty is pain and we discovered this long ago. So pack some Band-Aids to smother blisters on your feet or cuts on your legs (eeek! What if you cut yourself while shaving? No blood on the wedding dress, please!). Crossing fingers you don’t to use them, but it would be worse to be without them, dontcha think?

Chalk:
No, your wedding isn’t a crime scene but it would be a crime if you smudged something on your WHITE DRESS (omg kill me now). Did you know that white chalk can cover up any superficial smear on your gown? Pack a few sticks and if you get a grease swipe from the car or some self tanner smudges off, you can cover it with some chalk. It sounds crazy, but it works.

Clear Nail Polish:
It’s unlikely you’ll be wearing tights, but if someone is, clear nail polish helps isolate a snag to keep it from spreading. Also, if you chip your nail, it’ll be annoying that you’ll have a missing chunk of color, but painting some clear nail polish over the area will smooth out the nail so you don’t get any threads caught or allow it to chip further. Basically, clear nail polish is amazing.

Dental Floss:
Stuff in your teeth isn’t cute. Duh. But also, dental floss helps tie up any loose ends. If a bracelet or necklace breaks, you can MacGuyver the jewelry by threading it together with some floss (true story: I did this with my wedding day bracelet that was too big). Or if a button from your bustle is dangling, thread it with some dental floss.

Hair Ties or Pins:
Bobby pins or ponytail elastics are crucial for hair emergencies. You may not be able to replicate your originally perfectly styled hair, but at least you can make sure it’s comfortable and neat looking.

Straws:
You’ll toast with Champagne. You’ll drink water to stay hydrated. You’ll have a DC with your lunch. but you do not want to mess up your lips! Add some straws (bonus if they’re flexi straws!) to your Meshugena Materials so you can drink up AND preserve your punem.

Tissues:
I think this one is self explanatory. If you need me to explain what you do with tissues, then I think we have a bigger emergency.

Tweezers:
A stray hair will drive you meshugena! Include tweezers with your Meshugena Materials.

Breath Mints/Drops:
You’ll be smoochin’! You’ll be close-talking with Aunt Elaine. You don’t want to be the bride with the bad breath. A little mint goes a long way so pick your favorite flavor and keep halitosis away.

Superglue:
When used properly, superglue is really super. It’s the best fixer upper for a broken nail, shoe heel, decorations, jewelry, bouquet doo-dads, and hair accessories.

Basic Toiletries:
Lotion, chap stick, deodorant — it’s a loooong day. You’ll want to keep things on hand with you as you travel from event to event. Touch ups from all three will serve you well and give you peace of mind that you’re moisturized and fresh.

Do you have any additional tips or ideas for our Meshugena Materials? We’d love to hear your wise words from experience!

Want to make me the happiest birthday girl ever and win a bag of bridal Meshugena Materials with some of the goodies listed here? Comment here or on Facebook now through Sunday night at 11:59 PST with your go-to secret weapon for bridal or special occasion emergencies. Winner will be selected at random and announced on Monday, June 10!

How To Write Your Wedding Vows

There are the traditional words that your officiant will have you repeat as you go through your Jewish or interfaith ceremony, but it may be your wish to express yourselves with your own personal words. I love the idea of writing your vows to customize your wedding because your guests get a chance to get to know you even better as individuals and as a couple.

You may be the type to have written your vows months in advance with a confident grin sprayed across your face. Or, you may be the type to be in the middle of your eyelash application on the morning of your wedding still without any idea of what to say. Whether you’re a planner or a last minute writer, these tips should be able to help you feel good about the words you’ll share with your love in front of your loved ones.

There’s nothing worse than writer’s block. Trust me. I know this first hand. There are so many nights I stare at a blank page on the back end of The Wedding Yentas and agonize over what to write for all of you. But then I just … write. I just dump out ideas. They are raw and messy and completely disjointed, but once I find a concept that seems to afford itself some kind of direction, I then fine tune the words so they make sense for you. You should’ve seen THIS post before that whole exercise. Oy!

So, what I’m saying is, jot down some notes. Scribble out some thoughts. They don’t have to make sense to anyone, but you. This step of the process is more of a brain wake up than a development of a masterpiece.

Writing your wedding vows -- Photo by Sharon Schuster

You can even do some research. Yes, you can even Google your wedding vows. I don’t mean to tell you to copy a stranger’s words entirely, but perhaps you’ll stumble across something that inspires you. Or maybe you’ll find a quote that you’ll want to weave into your own vows. This is a great way to fuel your ideas and personal words.

Then, add some of your own anecdotes. You can go all out with the mush factor or you can spice up your vows with humor. Personally, I love a little mish-mosh of both. A little sarcasm has a place in a wedding ceremony. Plus, if you don’t have a sense of humor, the ebbs and flows of marriage are going to be a little rough on you. May as well set the humorous tone from the very beginning, right?

You can list things that are important to you. For instance, I vowed to give Mr. Yenta total ownership of the remote control and to let him eat all the mushrooms off my plate because I hate them (plus, he’s a fun guy… haha, get it?). Then I also went the sappy route, declaring how much he changed my life for the better and opening up about our dreams for the future. I tied in our interests — theatre, baseball, traveling, food — and also touched on some memories. I sealed it in with my feelings. I share this to assist you in your brainstorm for your own vows.

Photo by Eight20 Photography

Lastly, when you finally settle on your words, your tone, and your flow, you’ll want to rehearse it a little so you’re comfortable with the words in your mouth. You don’t have to memorize it because often, vows recited by memory sound insincere. But you should at least be very familiar with it so that you’ll feel secure if you end up getting distracted from giggles or, more likely, tears.

And if you come up with your vows minutes before walking down the aisle then all I have to tell you is to speak from your heart like I hope you will from that day forward.

{Real Jewish Weddings} Woodland Hills, CA

Lisa had been on JDate casually looking around checking out the goods. She had gone on a few dates, but nothing serious came out of them. One night, while at home sick, she got an IM from a guy whose first question didn’t have to do with a web cam… Major bonus points! What started as an informal chat back and forth turned into hours and hours of conversation online. Lisa was definitely intrigued and agreed to meet Kevin for a drink the next week.

They dated casually for the next month or so, but really became more of best friends. Then Kevin went out of town for a week and when he got back, they realized that something incredible was just about to happen.

To celebrate their two-year anniversary, they planned a trip to San Francisco. While hiking at Land’s End on a gorgeous sunny morning, Kevin got down on one knee (very close to a cliff!) and told Lisa he loved her and wanted to spend the rest of his life with her. You know what the next question was, and her answer was obviously a hearty YES!

They started to plan right away and eight months later, truly had the wedding of their dreams! The are as happy as ever and loving being a family of three — yes, three. Kevin officially “adopted” Lisa’s dog, Elsie, on their wedding day!

Mazel tov, Lisa and Kevin!

(p.s. Look closely! You may spot Desiree and yours truly as bridesmaids! And even Baby Yenta and Mr. Yenta are part of the bridal party! Not only are you about to enjoy looking at a beautiful wedding, but we were honored to be by the side of a beautiful couple, our dear friends!)

Los Angeles Jewish Wedding

KL1

KL2

KL3

KL4

KL5

KL6

KL7

KL9

KL10

KL11

KL13

KL14

KL15

KL16

KL17

KL18

KL19

KL20

KL22

KL24

KL25

KL27

KL28

This JDate couple knew they wanted a traditional and personal wedding day. Before the ceremony, Lisa and Kevin got together with immediate family and the bridal party to sign a beautiful, modern ketubah. The chuppah ceremony immediately followed and they used Kevin’s tallit and kiddush cup, and they both circled each other at the beginning of the ceremony.

KL29

KL30

KL31

KL32

KL34

KL35

KL36

KL37

KL38

The vision for the wedding was a blend of rustic and modern details with a major emphasis on yellow and grey. If a wedding could be in the theme of an Anthropologie store, then that was the plan for the event.

Lisa and Kevin designed simple floral arrangements, so as to not take away from the giant chandeliers and romantic feeling of the room. Therefore, it was all about the small details, and they made sure they kept with the theme: tablecloths, kippot, candy cups, escort cards, framed signs, favors… they all were carefully planned.

The dessert table was always a dreamy vision in their heads that finally came true. Wedding cake, cupcakes, cakepops, marshmallows, macarons, chocolate chip cookies, chocolate covered pretzel rods, frosting shots,and gum balls all adorned a beautifully styled dessert buffet. And, while not on the actual dessert table, a rainbow sprinkled challah was the focus of blessing before food service began.

KL39

KL40

KL41

KL43

KL44

KL45

KL46

KL47

Lisa and Kevin’s wedding was intimate, as they hosted about 50 people. They were surrounded by their family and closest friends, and felt very loved. Because of the small crowd, they originally thought they could do without having a DJ, and thankfully that silly idea got replaced by a fantastic woman who really kept the party lively, the guests entertained, and most importantly, created a super fun dance party all night long!

KL48

KL94

KL95

KL96

Photographer: Elizabeth Zuluaga Photography
Venue: The Villa
Day of Coordinators: Lindsey Sundy and Ronna Sundy
Florist: McCann Florist
Cake and dessert table: Cakes by Rumy and A Little Nosh
Wedding Bands: Wilson’s Jewelry
Bridesmaid Dresses, Wedding Dress. and Sash: David’s Bridal
Makeup Artist: Esther Jacob
Hair Stylist: Tina Gocke
Favors: Candied Cakes
Music: I’m a Girl DJ
Videography: Wedit
Officiant: Rabbi Glenn Ettman with Temple Sinai Palm Desert
Invitations/Stationery: Woo Paperie
Invitations/Stationery Design: Kevin Daniels, the Groom
Groom & Groomsmen Tuxedos: Friar Tux
Ketubah: Urban Collective

You’re Invited…:A Step-By-Step Guide To Ordering Your Wedding Invitations

Out of all your wedding tasks you have to accomplish, ordering and organizing wedding invitations may seem like the biggest headache. It may not be the most glamorous task (oo la la, dress shopping!) or the yummiest (cake tasting for the win!), but it’s a really important one. After all, how else are your guests going to know when and where to show up on your big day? It’s the foundation of your wedding day and can even set the tone for what guests can expect.

Want the scoop on the process? Here’s a breakdown before you have a breakdown.

Get Organized:
Before you even have to pick out your invitations, you have to pick out the people you want to receive them. Start early and start collecting addresses once you’ve finalized your guest list. Keep an organized spreadsheet and have it handy because once you receive your ready invitations, you’ll need to mail them out and the last thing you want to do is catalog addresses because it’ll slow your process down.

Plan Out:
If your wedding is Winter of 2013, you might think you have tons of time. It’s only June! What’s the rush? The wedding is the end of December! You have six-ish months! Right? WRONG! Work backwards. You need to mail out the invitations six to eight weeks before your wedding date. (late September/early October). Prior to that, you’ll need to assemble the invitations (may take a week). Before that, you’ll have order the invitations and they will take some time come in (sometimes four to six weeks depending on the vendor or manufacturer). That brings you to ordering in early August. Searching for the perfect invitation won’t be an instant task, either. You’ll look at many samples or visit many boutiques or designers. Take your time to shop. Give yourself at least a month. So now you’re looking at starting in July. It’s June now. Need I say more?

Play it extra safe and assume something will go wrong. I know, what happened to the optimistic Yenta? You never know! The manufacturer could go under (yay economy!) or there could be a typo on your response card. You never know. Don’t wait until the last minute to place your oder in case you have to make a quick reorder.

Search According To Your Budget:
Invitations work the same way as shopping for your dress: don’t fall in love with something out of your budget. If you can’t put down the cash for the Monique, by all means, don’t try on the Monique (I know, it’s so hard, but this is for your sanity). It’s no different with your invitations. If you know you can’t have letterpress printing in your budget, don’t even look at samples with such deliciously beautiful and drool-worthy fine details. You don’t want to have to overspend on invitations and you definitely don’t want to have to go take away from another area of your budget in order to have the suite you — oops! — fell in love with. Be up front with your invitation consultant about your budget and be sure to stick to it. If the consultant or designer tries to upsell you, it’s disrespectful and you should not continue with their services.

If you have no budget to speak of and money is of no object, well, by all means, why are we not friends? I like Marc Jacobs and I wear a size 8 shoe.

Shop By Feature:
Ask yourself: what’s the one element your invitation absolutely must have? A specific color? A design? A paper size or shape? Pick that one element and shop by that one element. In a perfect world, that one element complements your overall wedding style. Let’s face it, there are lots of pretty invitations to choose from, but if you select all the ones you like, you’ll never pick THE one. If it’s a turquoise and white color them you’re going for, that means you will shop invitations with only that theme. If you’re working with a designer who’s making a custom suite for you, feel free to bring pictures with you to share the features you like. Many wedding invitation websites allow you to search by feature as well, so utilize that convenience. A personal favorite is Wedding Paper Divas. Don’t get sidetracked and distracted by other — oooo!! Shiny invitations with rhinestones!!! You’ll be married before your invitations even go out. Get it?

Invest In Samples:
Once you’ve narrowed down your top picks, and I mean, tip top tippy-top picks (top three?), order samples. This way, you can touch your paper, feel the print, smell that fresh new paper smell — mmmmmmm. This is your invitation test drive. Get to know and love it because once it’s out of your hands, it’s hanging on someone’s fridge.

Overall, you’ll just feel better about your order because you courted before your committed. Hopefully you did the same thing with the fiance, yes?

Decisions Beyond Invitations:
Remember, you’re not just mailing an invitation. You’re mailing an envelope, a response card, maybe a directions insert, and so on. Oh yes, and are you choosing to line your envelopes? What about an outer fancy shmancy envelope? These are the big decisions, people! Don’t forget to weigh your priorities. That outer envelope with the guests’ name and address contains another big envelope which has the real good inside that one. Do you really need the outer envelope? It’s formal and it looks cool and who doesn’t like opening multiple envelopes from one mailing? But, not only does it give you more glue to lick, but it also will cost you an additional amount. The add-ons and extra components require you to do a little more research, so just when you think you’ve selected the invitation itself, you still have to settle on a couple more choices.

But wait! There’s more! Many designers also happen to have paper for other uses in each invitation line. Everything from table numbers to escort cards to thank you notes. Do you want to tie in your entire suite with what your guests see at the wedding? Some may say, “Oh, who’s going to remember the invitation once they’re at the wedding anyway?” I can’t answer that question for you, but you can at least weigh in and make that decision. This can be seen as a convenience or as an added expense. Up to you.

Decide On The Amount:
Here’s where you do some math. Remember your guest list that you compiled at the beginning of this exercise? Count up your guest list by household. Not people, but each address. Aunt Ruthie and Uncle Murray count as two people for your caterer, yes, but they are really only one combined person — or household — for your invitation order. Don’t assume the guest list equals the amount of invitations you should order. You’ll end up ordering about double of what you actually need!

Then, you’ll actually order about 15% more than the actual amount of households that will receive invitations. You may have last minute additions to who you want to invite or you might want to activate the [gulp] B List for those who can’t make it from the A List. Hey, it happens. The good ol’ trusty USPS may lose some in the mail or your friend moved and didn’t bother to tell you her new address, so you’ll have to resend some. Also, you or your parents may want to keep some invitations for scrap books or photo albums, so you’ll need some extras.

Proof ‘Em:
There is absolutely nothing more atrocious than placing your order, receiving your oder a month later, and finding that you are apparently marrying Wilma instead of William. Oy vey. Proof the invitations before you send the OK to print. Proofreading does not mean reading them over and giving a nod of approval. Proofreading is executing the following tasks:

  • Read it to yourself.
  • Read it out loud.
  • Take a sheet of notebook paper with holes and slide the hole over the line of print so as to isolate every. individual. word. on. the. invitation. Any mistake that’s there will stand out at you!
  • Give it to your mom to read. And your fiance. And your MOH. And your friend. And your podiatrist. Everyone in your inner circle must read it to themselves. And everyone in your inner circle must read it out loud.
  • Double check that the names and places are spelled correctly, addresses are listed correctly, numbers are ordered correctly, and basic English mechanics like commas and apostrophes are inserted correctly. It’s also a good idea to quadruple check that the wedding date and time are correct as well. You know, only a little important.

Celebrate:
You have placed your invitation order! Make another check on your list and breathe because this one was a doozy.

And then it’s time to move on to the next item.